
Fast-Track pyRevit System™

Written Summary
Summary of pyRevit Anatomy: What's Really Inside Your Extension 🧬
By now you should have your pyRevit extension set up — and most importantly, it has your own name on it. So far we renamed two folders, added a path, and boom, it works. Now let's look inside it and understand how it actually works, because it's 100% customizable. We can add, remove, rename, move, delete — anything you can imagine. And that's exactly what we're going to do in this lesson.
The folder structure IS your toolbar
Remember from the previous lesson: that whole toolbar you see in Revit is just a folder structure that pyRevit reads and displays inside Revit. Once you understand it — and it's really not that complicated — you'll be able to do whatever you want.
Here's the hierarchy, from top to bottom:
.extension folder — the root of your extension. Everything else goes inside.
.tab folder — represents an actual Revit tab. Whatever you name it is what you'll see in Revit, like we did with pyRevit School. You can have multiple tabs (Architecture, MEP, Structure...), but most people use just one — and that's more than enough, trust me.
.panel folders — these organize your buttons by category (Starter Kit, Resources, Placeholder, Dev Panel). You can even drag panels in and out of the ribbon in Revit.
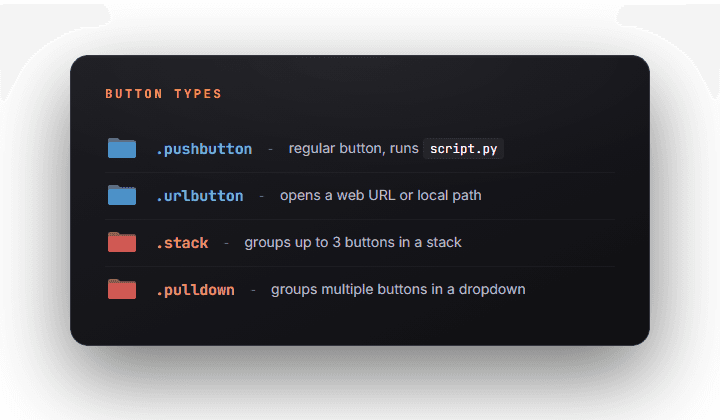
Pushbutton — the regular button. You click it, it executes Python code. By default it's just a placeholder with a print statement — we'll come back to that.
URL button — a button that takes you to a website. Click it and it opens a tutorial, your docs, whatever you point it at.
Pulldown — a dropdown "folder" where you put your pushbuttons.
Stack — puts two or three items on top of each other. Great for saving ribbon space — and yes, you can even put pulldowns inside stacks.
🖼️ [IMAGE: Side-by-side view — the extension folder structure in Windows Explorer next to the matching pyRevit ribbon in Revit, with arrows connecting .tab, .panel, and .pushbutton folders to their UI counterparts]
There are also two special utility folders we won't cover in the Fast-Track, but you should know they exist:
lib — one place for your reusable code. Write it once, reuse it in all your scripts, and stop copy-pasting the same thing everywhere.
hooks — a more advanced topic (I cover it later in the Power-Up section of pyRevit School). Hooks let you subscribe to Revit events and run code when they happen. Somebody syncs the model? Log some info. Somebody deletes an element? Check if it's a structural column and react. Cool stuff, but not today.
Alt+Click: your X-ray vision 🔍
Click any button in the starter kit and you'll get the default message — and notice what it says: hold ALT and click to open the source code of this button. This is a super useful feature in pyRevit.
Hold ALT and click any pushbutton.
Windows Explorer opens straight to that button's folder.
Inside you'll find a
script.pyfile and an icon.
Open script.py — Notepad is totally fine for now, we haven't set up a code editor yet. You'll see something like this:
Want to rename the button? Change __title__ and you're done.
What's really cool: you can explore the folder structure while looking at the ribbon in Revit. The Placeholder panel folder has a pushbutton example, a URL button, a pulldown example, a stack example — and each one maps exactly to what you see on screen. So you can look at any existing pyRevit extension, figure out how it's structured, and just copy and mimic it.
And you're not limited to your own extension. Go to the main pyRevit tab, hold ALT, click any button — there's the script file, the icons, the bundle file, everything. Same with extensions like EF-Tools. You can find the source code, learn from it, steal, reuse. That's honestly the number one reason everybody loves pyRevit: it's open source, and you can look at everything behind the scenes.
🖼️ [IMAGE: Alt+Click in action — Explorer window open on a .pushbutton folder showing script.py and icon.png, with the Revit ribbon visible behind it]
Edit your first button
Let's prove how simple this is:
Alt+Click a button and open its
script.pyin Notepad.Change the title:
Save it. Back in Revit... nothing changed. That's expected!
Go to the pyRevit tab → Reload. This reloads pyRevit and all its extensions.
Wait a moment, come back — and there's your Revit Killer Feature button. Obviously it's just a print statement for now, but we'll extend it later. You can even copy a whole button folder from another extension into yours, and it'll just work. That's how pyRevit works — and that's why it's so amazing.
Clean up, duplicate, and reorder
Now let's make this extension yours:
Alt+Click into the extension and delete what you don't need — I removed the whole Resources panel and the buttons I don't use.
Duplicate a button: copy a
.pushbuttonfolder, paste it next to the original.Control the order with number prefixes on the folder names —
1_,2_,3_and so on.The displayed name is NOT the folder name — it lives in
__title__inside the Python file (or in abundle.yamlfile; I'm not a big fan of those, but the pyRevit dev team likes them). So open the duplicatedscript.pyand rename it to Push Button 2.Reload pyRevit again.
💡 Tip: Hunting for the Reload button on the pyRevit tab gets annoying fast. Open Revit's keyboard shortcuts (the KS command), find Reload, and assign something like PRR (pyRevit Reload). Some people also just copy the Reload button into their own extension.
⚠️ Important: The order isn't always updated correctly on the first try. New items usually get added to the end, and buttons moved into stacks might not show as stacks at first. Whenever something looks off with order, position, or stacks — restart Revit. In 90% of cases that solves it. Don't panic, trust me.
Give your buttons proper icons 🎨
Default icons are fine, but let's make them yours. Head to icons8.com:
Search for what you need, and pick a consistent style — I've been liking the Stickers style lately, but use whatever you like. Just stick to one style across your extension.
Recolor it if you want — I swapped the blue for orange.
Download it at 96×96 pixels. That's the maximum — icons can be smaller, but not bigger, or you'll get warnings. And that's not nice.
Alt+Click your button, delete the existing icon, paste the new one, and rename it to
icon.png. The name always has to end inicon.png.Reload pyRevit — and there's your updated icon.
Want different icons for light and dark themes? Add a second file called icon.dark.png — then icon.png is the light version and the dark one kicks in with dark theme.
💡 Tip: I prefer one colored icon (maybe with a border) that works in both themes. Revit sometimes doesn't register the theme switch and icons turn grey — and when you have 50+ tools, maintaining two icons per button gets annoying. One good colored icon, zero headaches.
🖼️ [IMAGE: icons8.com with the Stickers style selected and the 96x96 download option highlighted]
🖼️ [IMAGE: The ribbon in Revit dark theme showing the new colored icon still looking sharp]
Control panel order with bundle.yaml
One more thing. Alt+Click your way up to the .tab folder level and you'll notice a bundle.yaml file. These files hold metadata — and one important piece is the layout, which controls the order of your panels:
List your panel names in the order you want, and pyRevit follows it.
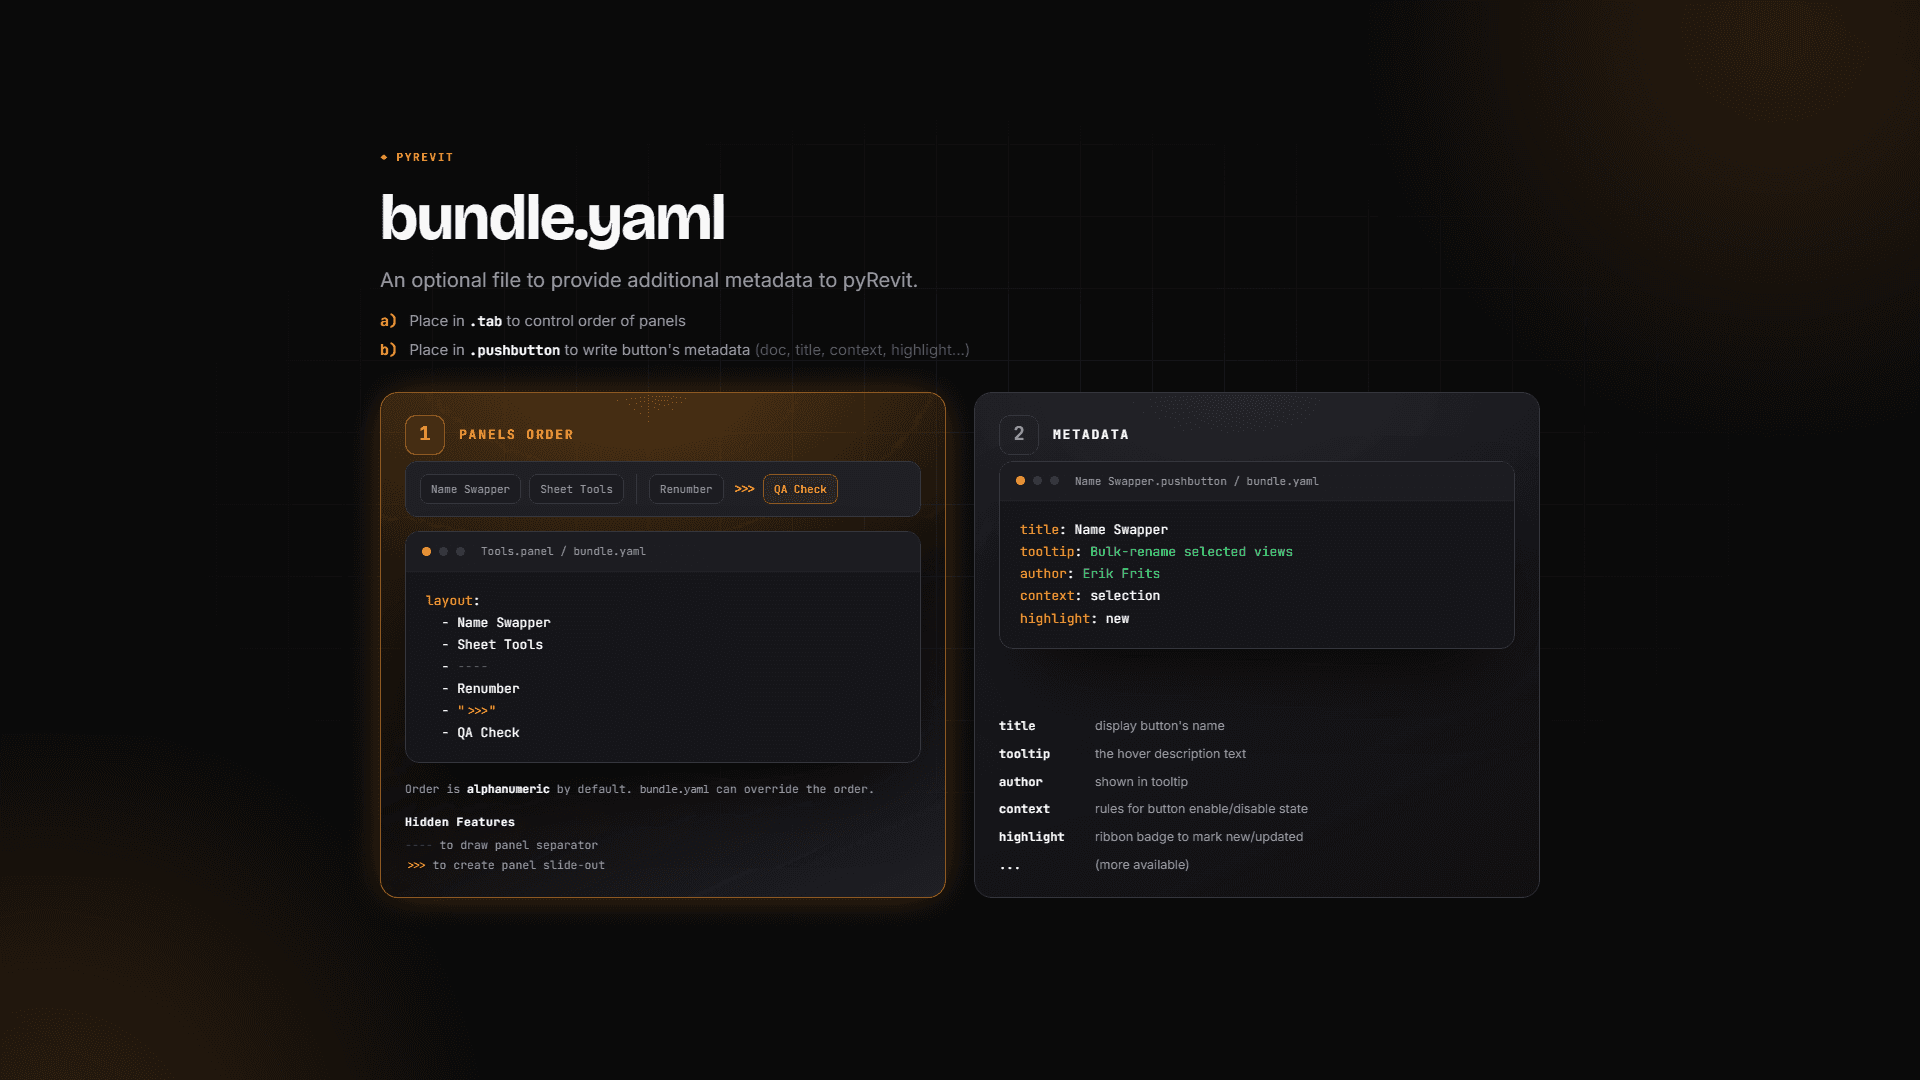
Fun fact: it used to be that a new panel wouldn't show up at all unless you added it here — I copied a panel, renamed it to New Panel, reloaded, and it showed up anyway. Looks like the pyRevit team fixed that, which is nice. But if a panel ever goes missing or lands in a weird spot, this file is the place to check.
What's next
That's pyRevit anatomy — you now control everything inside your extension: names, locations, icons, order, all of it. And remember, it's all open source: look at other extensions, get inspired, steal their tools. Totally fine. Next up, we'll finally set up your code editor in Quick-Start: VS Code — because I bet you can't wait to jump into actual pyRevit code. See you there!