
Fast-Track pyRevit System™

Lesson 9
Creating your first pyRevit tools
Written Summary
Build Your First pyRevit Tool: NameSwapper 🛠️
Finally — the moment you've been waiting for. It's time to create your own pyRevit tool from scratch.
In this lesson we'll build NameSwapper: a real button inside Revit that selects views, applies renaming rules, changes the view names, and reports what it did. Quick and dirty proof of concept — exactly how every real tool starts.
Create the button
First, open Revit. Any project works — I'm using the sample project in Revit 2025, but other versions are totally fine.
Now let's create the pyRevit button. You've got two options:
Reuse a placeholder — Alt-click one of the placeholder buttons in your extension and edit its script.
Use the pyRevit button generator — my preferred way for a fresh tool.
Here's what we'll do in the generator:
Remove the extra entries — we just want a single push button.
Name it NameSwapper (or whatever you want — keep it simple).
Pick a panel if you want it somewhere specific.
Click Create.
And that's it — you've got a new button called NameSwapper sitting in your ribbon.
🖼️ [IMAGE: pyRevit button generator dialog with a single push button named "NameSwapper" about to be created]
Give it an icon (or don't — yet)
The default icon screams "work in progress" — and honestly, that's fine for now. You can always swap it later.
When you're ready, grab icons from icons8.com, one of the most popular places:
Search for something like "swap".
Pick a style first — lately I like the sticker style — then tweak the colors if you want.
Download it at 96×96 pixels or less. That's the limit that matters.
Copy the file, Alt-click your button to open its folder, and replace the existing icon.
⚠️ Important: After changing icons (or scripts' metadata), click the Reload button in the pyRevit tab. Revit won't pick up the change until you do.
I'll actually keep the work-in-progress icon for now — it's very intuitive that the tool isn't finished. We'll swap it for the real one later.
A quick tour of the boilerplate
Alt-click the button again and open the folder in your code editor. I'm using Cursor — VS Code works too, but I'd recommend sticking with Cursor for now.
The script comes with generic boilerplate that's super useful. Here's the rundown:
The UTF-8 line is special encoding for your characters. Remove it and you might get issues with special letters (German has all those weird ones). Just leave it — it's always the first line.
__title__is the button name you see in the ribbon.__doc__is the tooltip you see when hovering over the button. My default template has fields for description, steps, to-dos, and last update — I developed it over the years. Fill it in, trim it down, or replace it with one line like above. Reload, hover, and you'll see it live.
Then the imports:
You won't always need all of these — but it's much simpler to delete a line than to sit there trying to remember how to import List from .NET. That List is often required by Revit API methods, so it stays in the template.
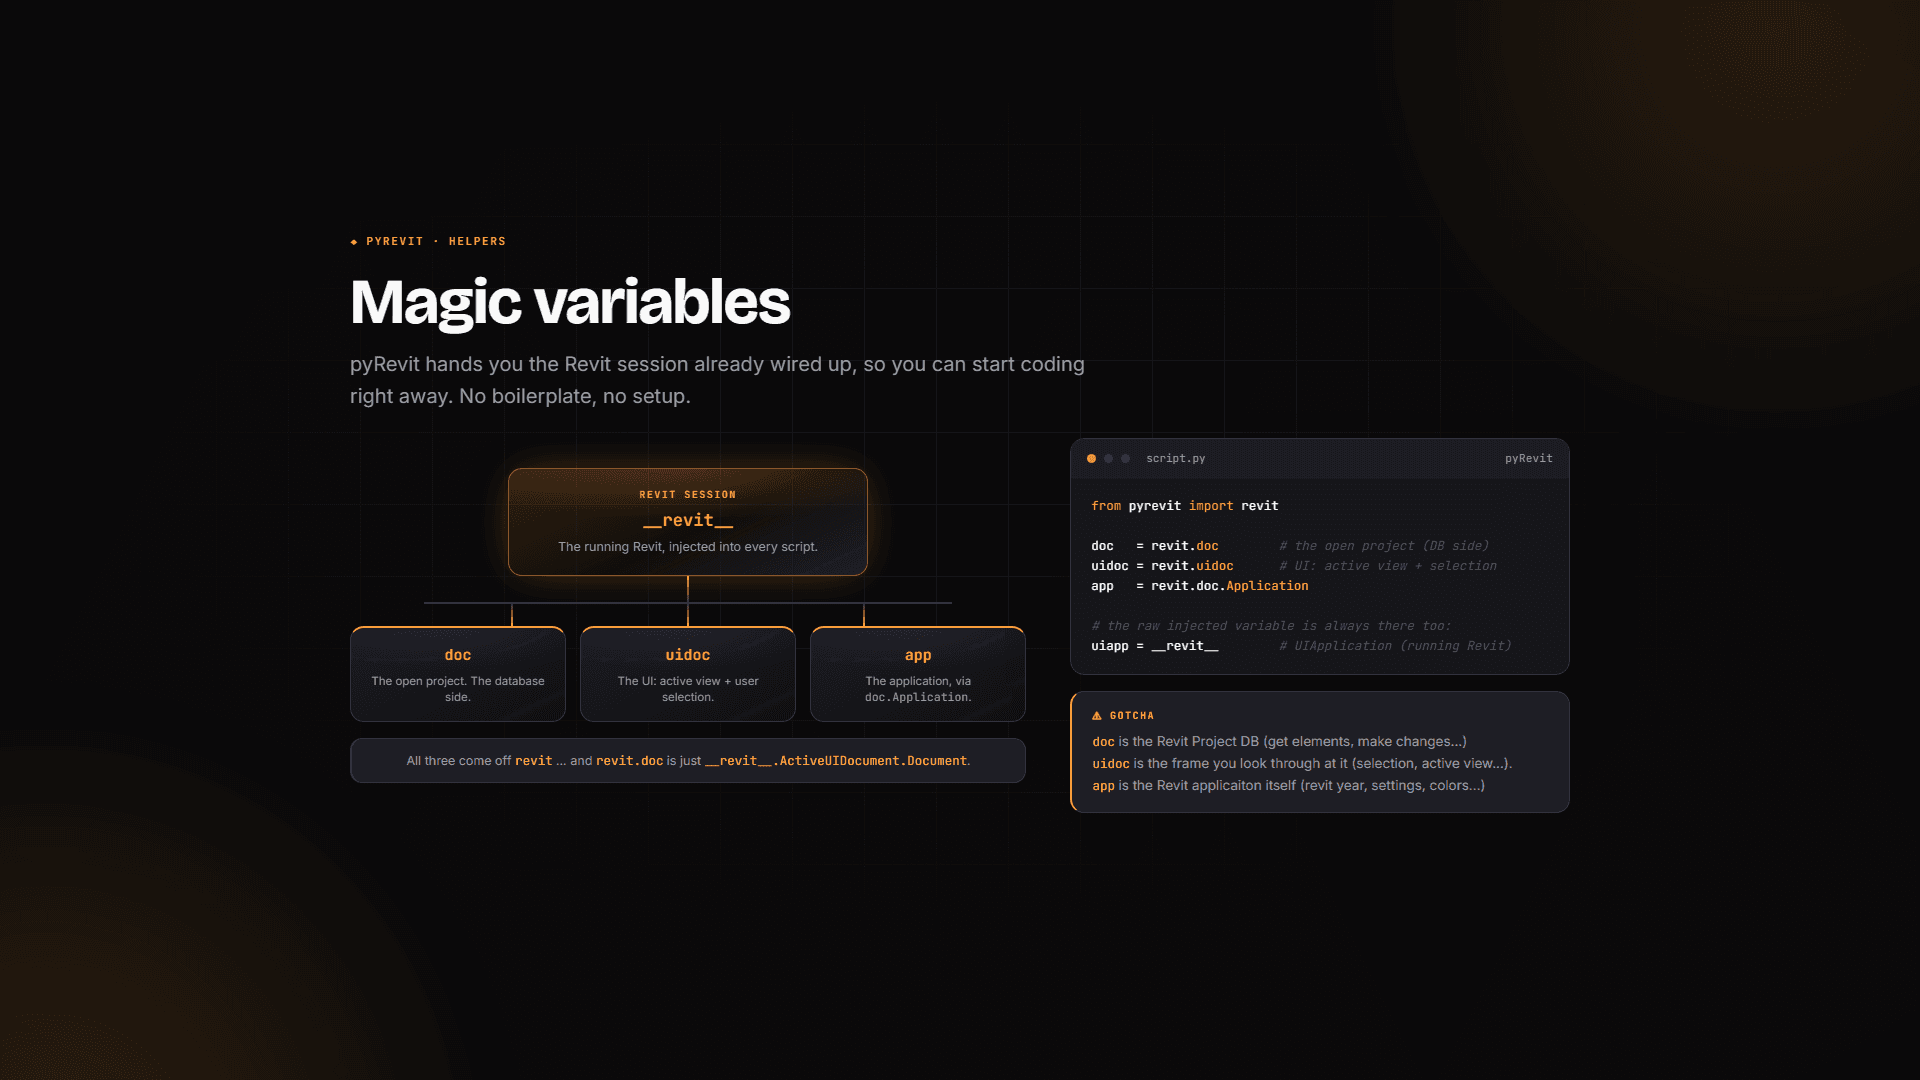
And the variables:
docis the real Revit project — the one you get elements from and make changes to.uidocis mostly for selection — prompting the user, reading what's selected.appis the application — check the Revit year with its version number, change color settings, that kind of thing.outputcomes from pyRevit and controls the output window for nicer prints.
Finally, delete the example print statement in the main code section. That was just a placeholder message — this is a real button now. Let's do some work.
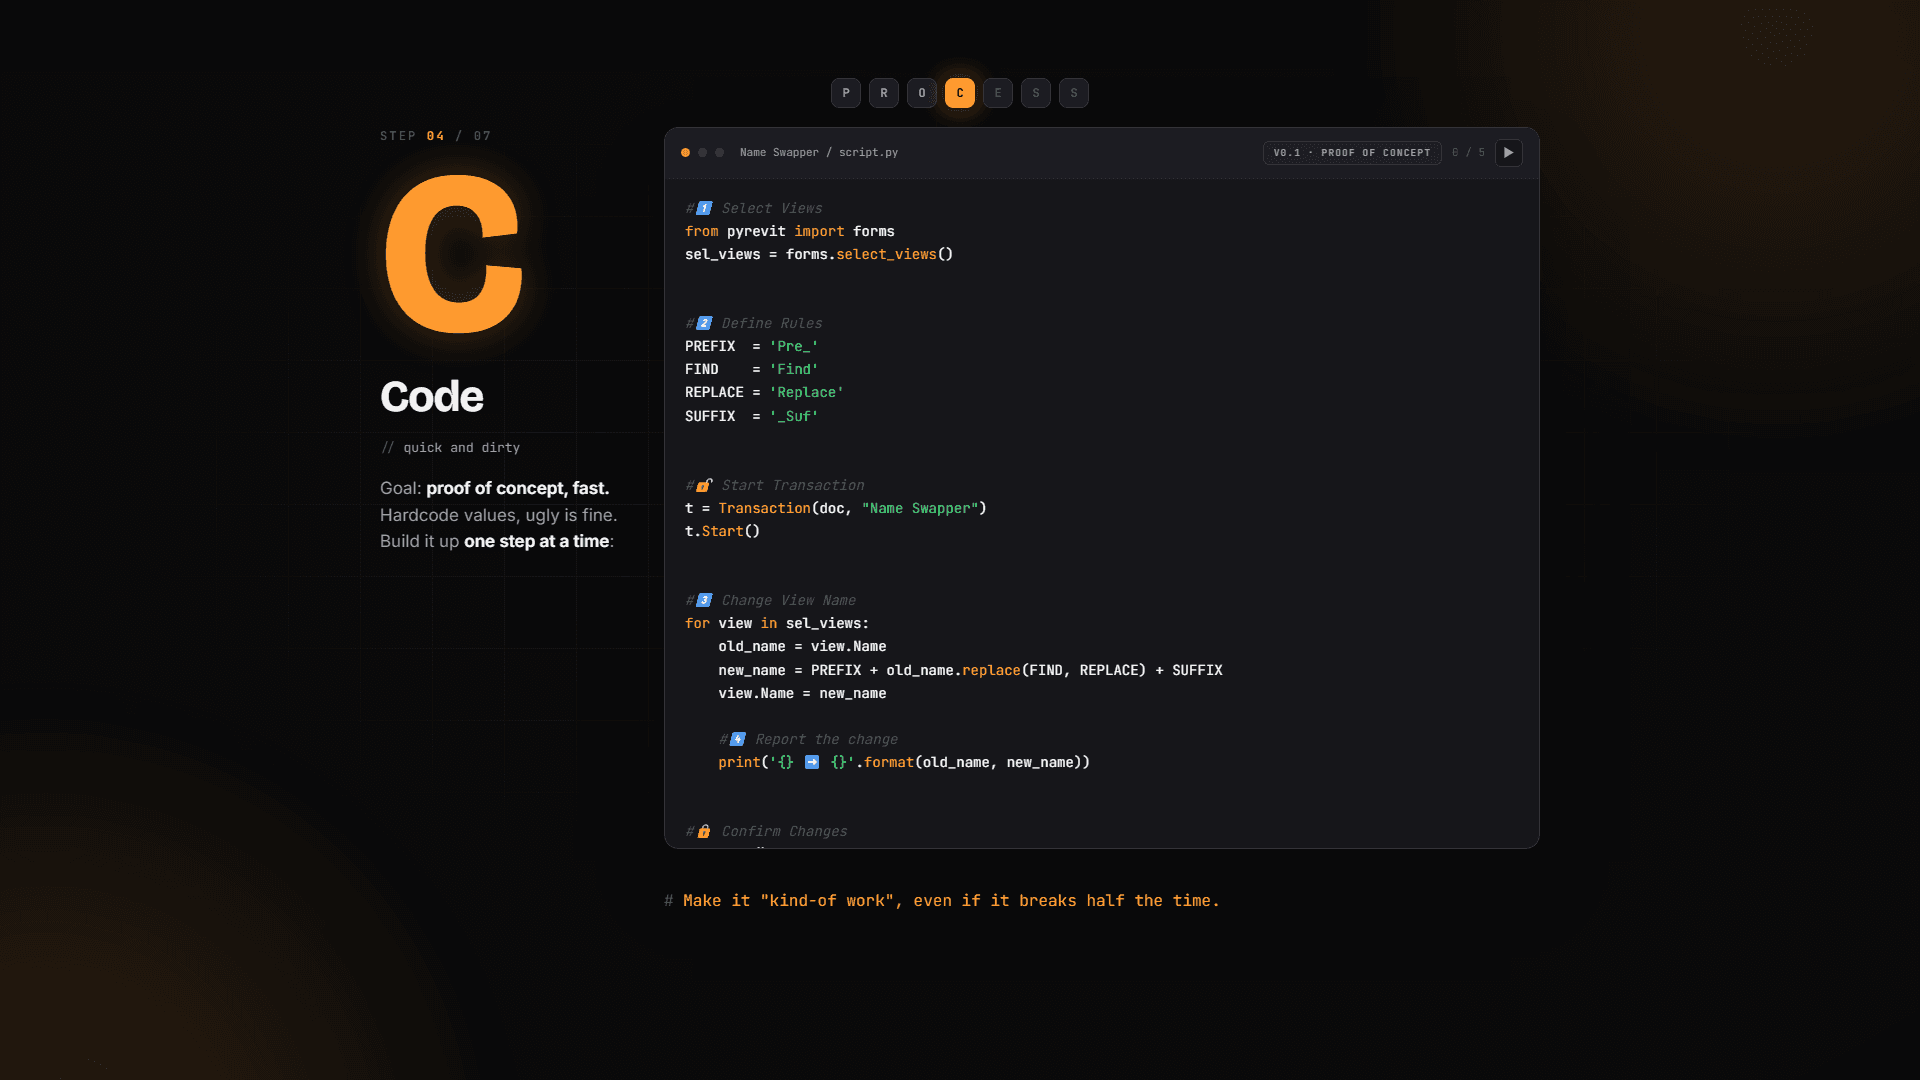
Step 1: Select views 🎯
We already have a plan from the previous lesson: select views → define renaming rules → change view names → report changes. Let's follow it.
As soon as I type a comment, the AI in Cursor suggests the code — I can accept it with Tab. But especially as a beginner, do the research first. Go to the pyRevit docs and find Effective Inputs — such a good resource.
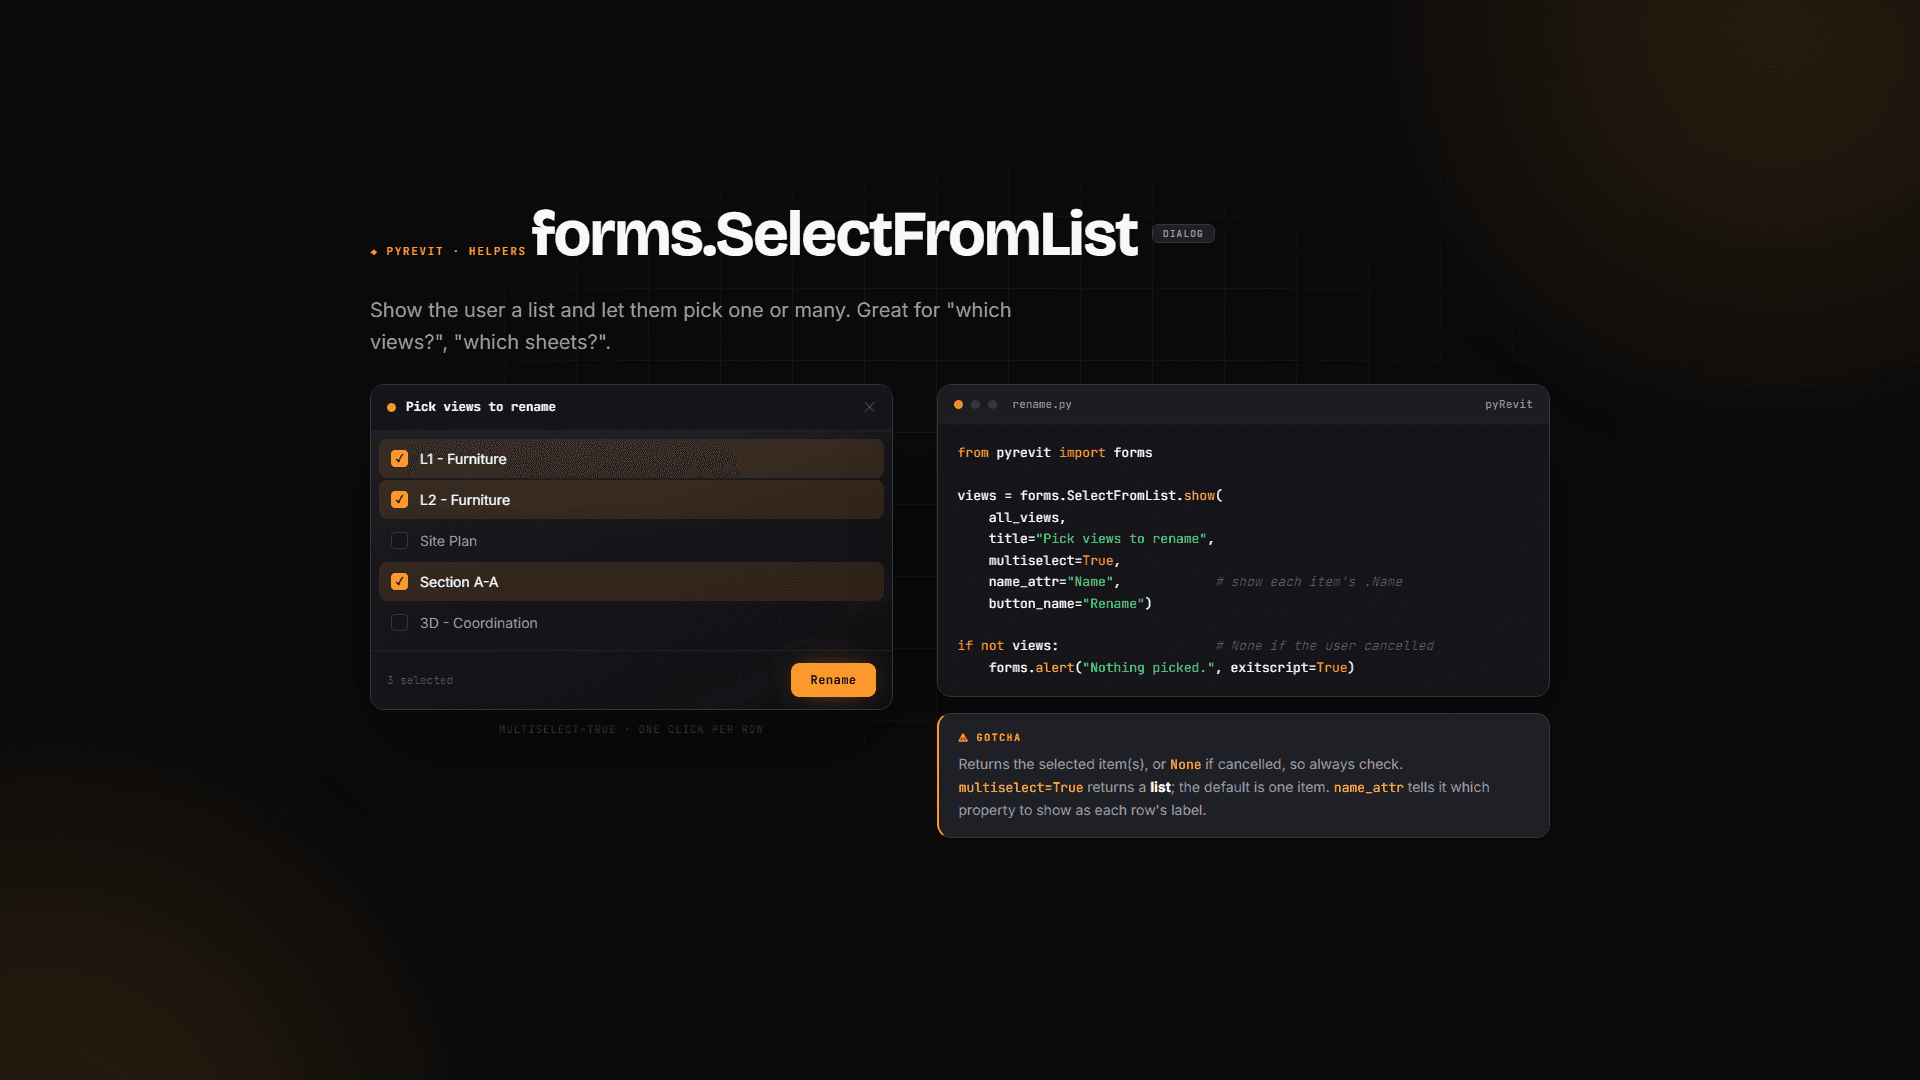
pyRevit ships with a ton of ready-made UI forms: yes/no dialogs, alerts, toasts, option pickers... And there's a whole section on selecting views — simple selection, filtered selection, legends, view templates, schedules, sheets, revisions. It's literally copy-paste. That's why everybody loves pyRevit — it's super beginner friendly.
💡 Tip: Scroll through the whole Effective Inputs page once, even the parts you don't need today. Just knowing what's possible will save you hours later.
Grab the simple one and paste it in:
The forms import is already in the boilerplate — you'll use these forms a lot, so get familiar with them.
Reload, click the button, and you get a menu with all your views. Pick a few floor plans — L1, L2, L3 — hit Select, and the console prints a list of views.
Don't get overwhelmed by the long print output like <Autodesk.Revit.DB.ViewPlan object at 0x...>. It just tells you the object type and where it lives in memory — that's how Python tracks it. Ignore the memory part, look at the class: "oh, I got some view plans, great."
Step 2: Define the renaming rules
We're going to cut corners where we can. No fancy input form yet — just hardcoded rules:
Notice the capitals? That's the Python convention for constants — values that don't change while the script runs. Technically it's just a variable with a fixed value, but it makes them easy to spot at a glance.
Later we can decide if it's worth adding forms for these. First, let's test the whole idea of the tool.
Step 3: Rename the views
Now we need to go through each selected view. That's a loop in Python:
Think of it like this: if your list has items A, B and C, the loop grabs A first, does something with it, then moves to B, then C. The name you define after for — here it's view — holds those values one at a time.
From the Revit API documentation we learn that views have a property called Name — exactly what we need. Even better: it's not only readable, it's also writable. We can assign a new value to it.
We're just applying the rules: take the prefix, take the current name with Python's .replace() doing the find/replace, and add the suffix. Super simple.
For the reporting, notice we're passing three items to print — in Python, print takes as many items as you want. We could combine them into a single string, but that's not relevant now.
The error you WILL see (don't panic)
Let's run it. Click the button, select some views and... error. A very common one:
"Attempt to modify the model outside of transaction."
⚠️ Important: Don't be afraid of errors — they don't break your project. The script just didn't work, nothing was changed, and Revit reverted to the original state.
Here's how to read an error message:
The file name — always the same here, your script.
The line number — e.g. line 54, where it broke.
The actual message — the most important part. In our case: we tried to modify the model outside of a transaction.
🖼️ [IMAGE: pyRevit output window showing the "Attempt to modify the model outside of transaction" error with the line number highlighted]
As I mentioned before: to make any change in a Revit project, you need a Transaction. You start it, make your changes, and commit. That's you explicitly telling Revit: "hey, as a developer, I do want this change." It prevents accidental changes — a really great feature.
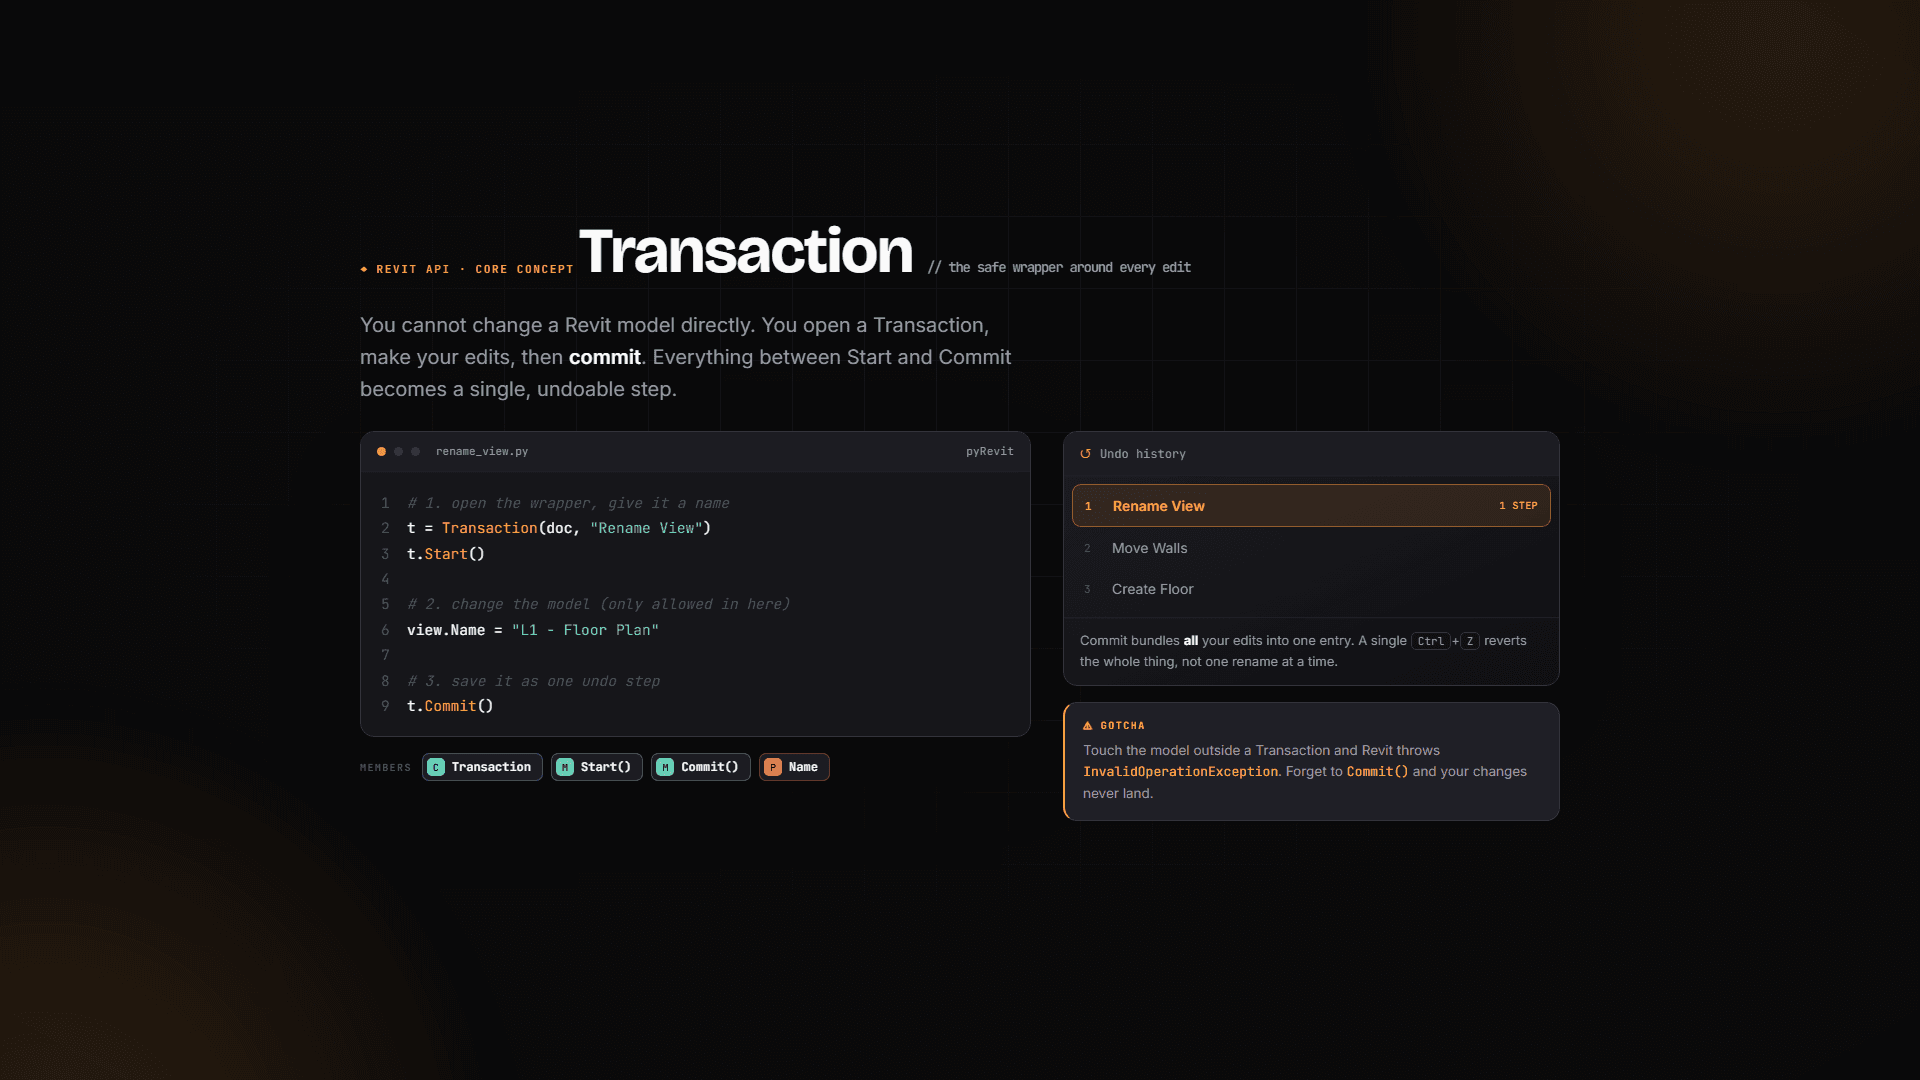
Wrap it in a Transaction
Creating a transaction is simple — you provide the document you're changing and a name. The name shows up in Revit's Undo menu later, so make it readable:
Your changes go between t.Start() and t.Commit().
💡 Tip: In 99% of cases, transactions should NOT live inside loops. If you rename 10 views with a transaction inside the loop, Revit opens and closes a change 10 times: change, close, change, close... Take it outside the loop and do it once: open, rename all views, commit. Select the lines and use Shift+Tab to move them left.
Test it 🎉
Now we're ready. Click the button, search for your floor plans, select L1, L2 and L3, hit Select.
Look at that — the report shows each old name and its new name, and the change is reflected in the Project Browser. The proof of concept works.
🖼️ [IMAGE: Output window showing renamed views (old name -> new name) next to the updated Project Browser]
Congratulations — you just built your first pyRevit tool. A real button inside Revit, made by you. Isn't that freaking awesome?
And let's be honest: it's far from perfect. There's no UI, the reporting is way too basic, and it will probably break if you decide to share it. But it works, it's yours, and every tool starts exactly like this — with quick and dirty code. We're just following the process.
What's next
Now the real work begins: we'll add a UI form, better reporting, improved code, and some stress testing — so by the end you have a tool your team can't work without. Let's keep coding, and I'll see you in the next one.