
Day
01
Challenge
Day
01
Challenge
In-Place Elements often do not follow modelling standards and can create many issues in your projects. So let's learn how to find them and provide interactive report to users.
Today We're Practicing:
>>>
Revit API Collectors
>>>
How to read Properties
>>>
pyRevit Linkify


Let's Create
"In-Place Hunter"
Using 7-Step PROCESS
Let's Create
"In-Place Hunter"
Using 7-Step PROCESS
PLAN
In-Place Elements…
If you ignore and let your team use In-Place elements every time they don't have a family, your project will become a mess…
They don't have proper parameters, location, and other controls we often need… So we better hunt them down before it's too late.
So, The Goal for Today's Tool:
Create a tool that can find all In-Place Elements in the project and create an interactive report to easily Select or Find them to manually inspect each.
This takes less than 25 lines of code!
RESEARCH
Coding CheatSheet
Here's everything you might need for today's challenge.

Coding Blocks
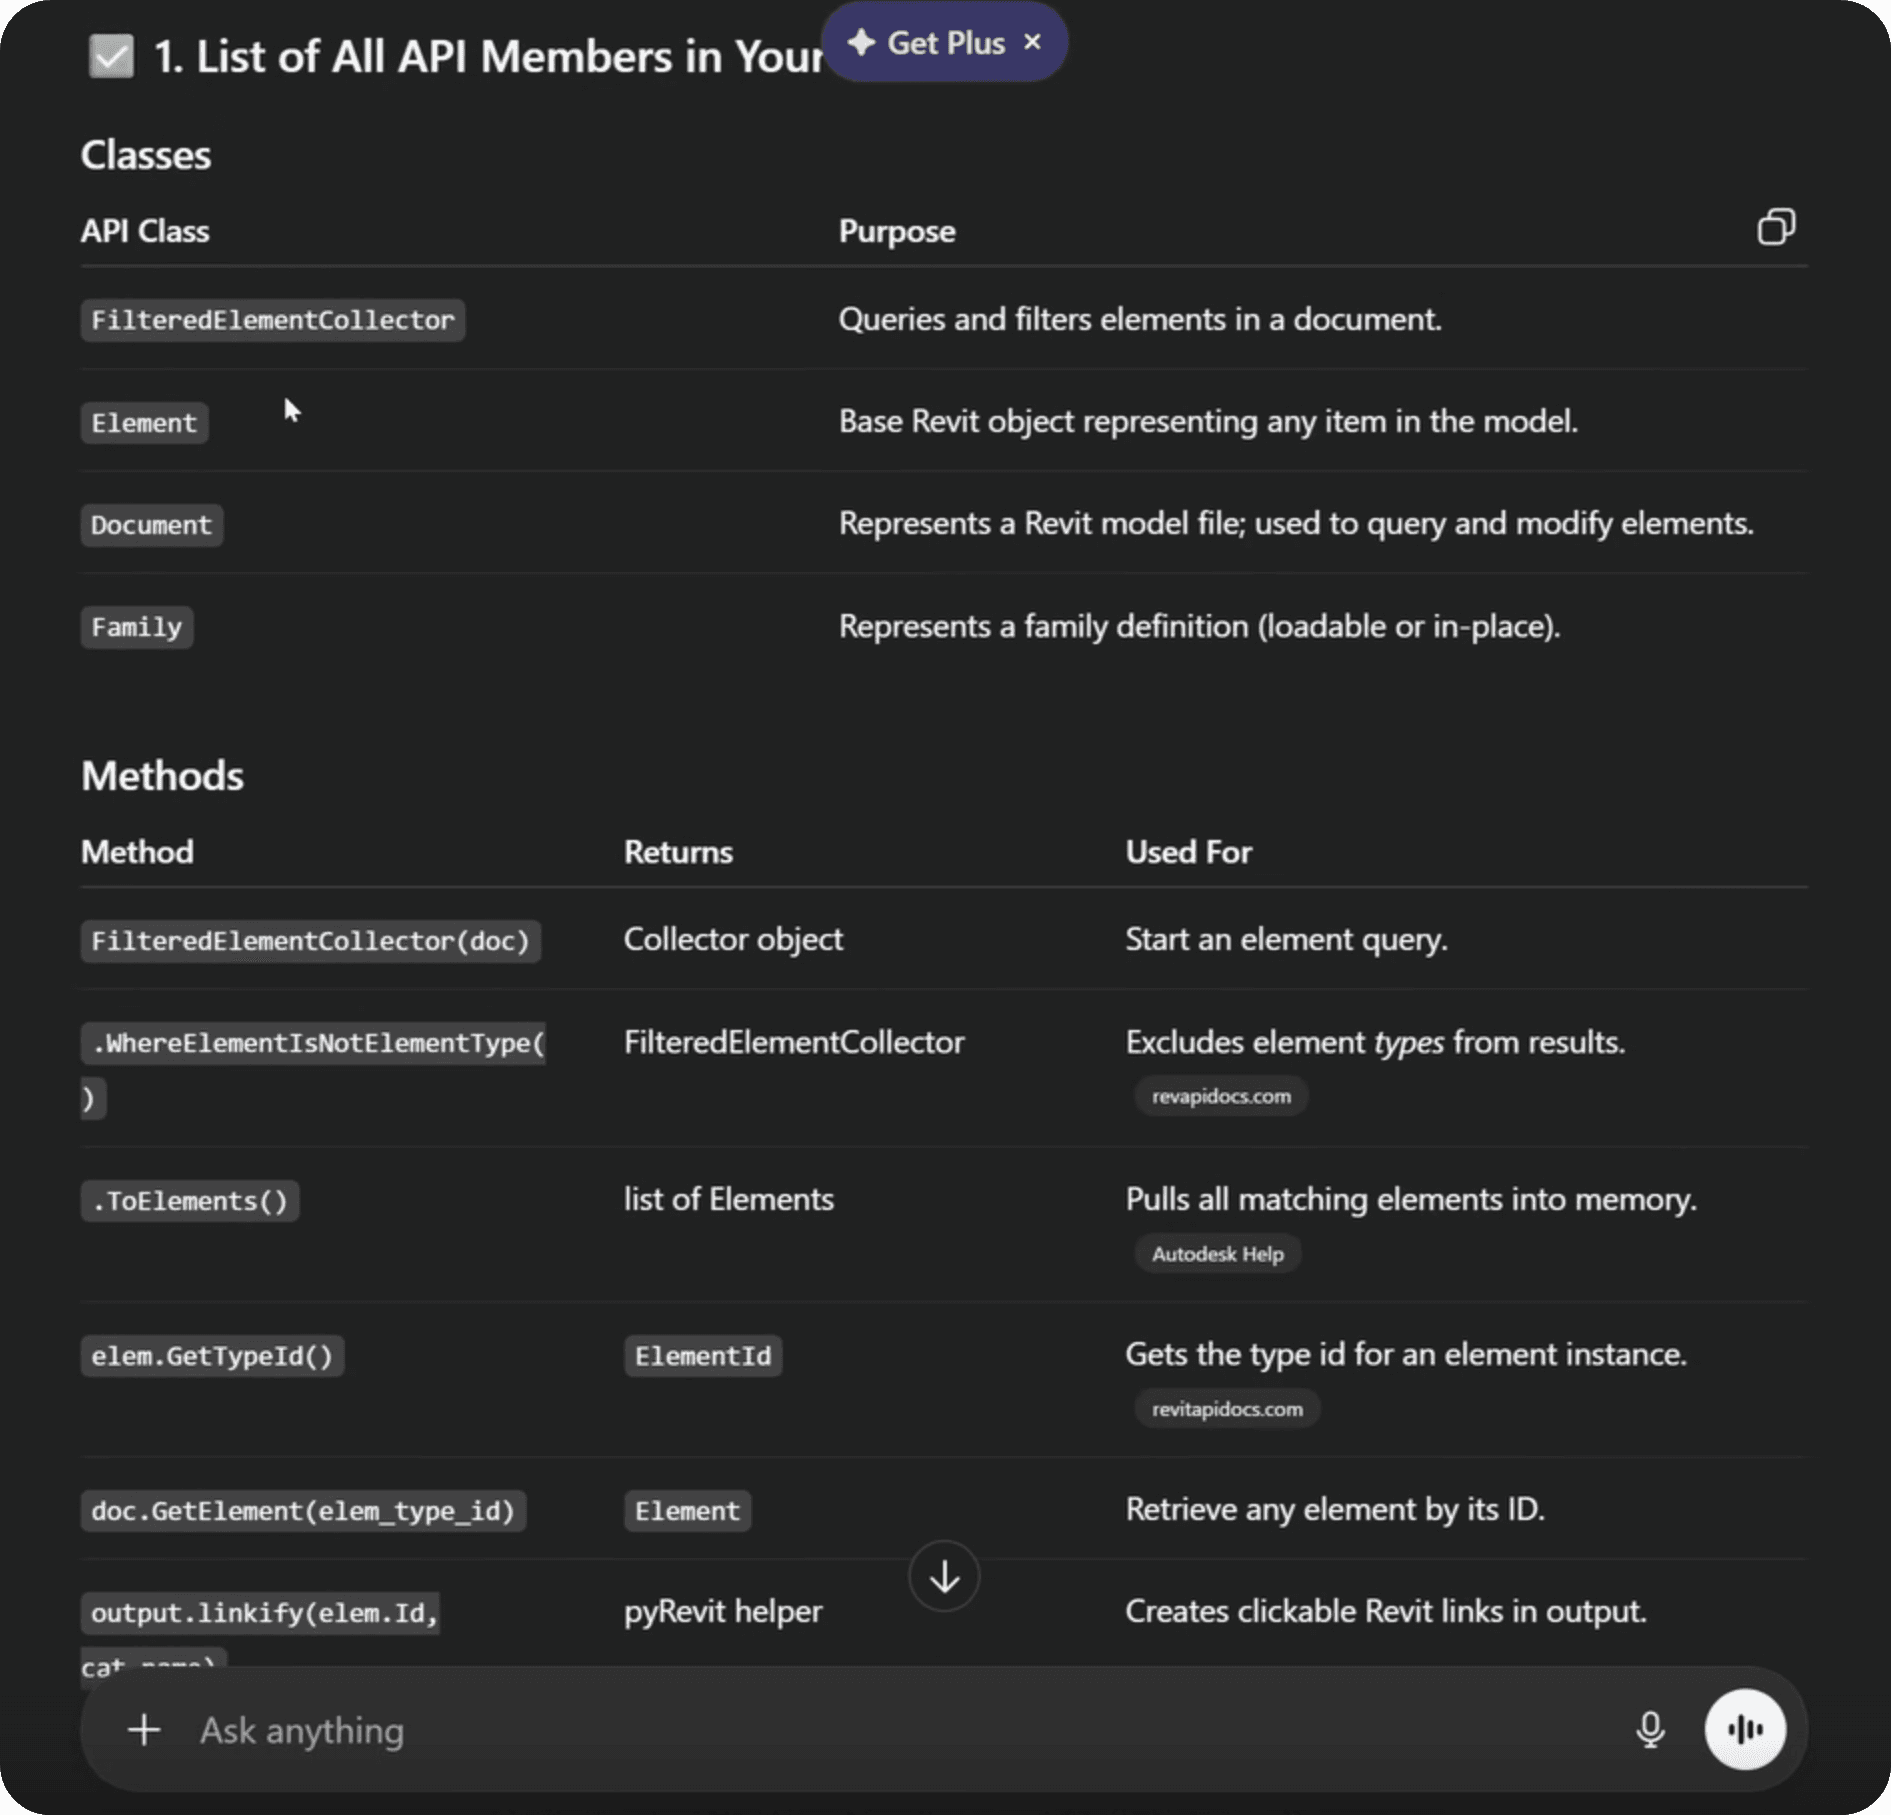
1. Get All Elements
3. Check if Element Is In-Place
5. Print Markdown (bonus)
2. Get Element Type/Family
4. Create Linkify Object
1. Get All Elements
2. Get Element Type/Family
3. Check if Element Is In-Place
4. Create Linkify Object
5. Print Markdown (bonus)

Revit API Docs

pyRevit Dev Docs
pyRevit Dev Docs
pyRevit Docs: output.linkify (Technical Docs)
pyRevit Labs: output.linkify (Samples Docs)
pyRevit Docs: output.linkify (Technical Docs)
pyRevit Labs: output.linkify (Samples Docs)

Notes
🔸 In-Place Class
All In-place elements use FamilyInstance class. This can be useful for using collector correctly.
You can test it by creating dummy elements, and look at them with Revit Lookup.
🔸 FEC OfClass vs OfCategory?
Beginners often confuse Class and Category in API (e.g. Wall Class / Wall Category…). But they are not the same…
Category - is just a property that elements have. Instance/Type often share the same.
Class - Is an actual Revit API class that element uses for functionality. Instance/Type usually have different classes.

Extra Resources

AI Prompt
You can ask AI to help you with the research
but it's NOT 100% perfect solution. Do not rely too much on AI.
RESEARCH
Coding CheatSheet
Here's everything you might need for today's challenge.
Coding Blocks
1. Get All Elements
2. Get Element Type/Family
3. Check if Element Is In-Place
4. Create Linkify Object
5. Print Markdown (bonus)
Revit API Docs
pyRevit Dev Docs
pyRevit Docs: output.linkify (Technical Docs)
pyRevit Labs: output.linkify (Samples Docs)
Notes
🔸 In-Place Class
All In-place elements use FamilyInstance class. This can be useful for using collector correctly.
You can test it by creating dummy elements, and look at them with Revit Lookup.
🔸 FEC OfClass vs OfCategory?
Beginners often confuse Class and Category in API (e.g. Wall Class / Wall Category…). But they are not the same…
Category - is just a property that elements have. Instance/Type often share the same.
Class - Is an actual Revit API class that element uses for functionality. Instance/Type usually have different classes.
Extra Resources
AI Prompt
You can ask AI to help you with the research
but it's NOT 100% perfect solution. Do not rely too much on AI.
OUTLINE
Step-by-Step Plan
Break down logic of the tool idea into smaller chunks so it's easier to brainstorm, find hidden steps and code.
1
Get All
Elements

2
Filter In-Place
Elements
3
Create Interactive Report (Linkify)
1
Get All
Elements
3
Create Interactive Report (Linkify)
2
Filter In-Place
Elements

NB!
TRY BUILDING
THIS TOOL YOURSELF
DON'T RUSH TO SOLUTION
Unless… You're a Beginner
According to GENERATION EFFECT
The Harder You Work, The Deeper It'll be Wired in Your Brain
NB!
TRY BUILDING
THIS TOOL YOURSELF
DON'T RUSH TO SOLUTION
Unless… You're a Beginner
According to GENERATION EFFECT
The Harder You Work, The Deeper
It'll be Wired in Your Brain
CODE
Code Quick-n-Dirty.
The Goal is to create a proof of concept. Don't try to make it perfect. Skip steps if necessary. Keep it ugly. Keep it slow. JUST. MAKE. IT. WORK…
Create Proof Of Concept
To create a proof of concept we can simplify steps to focus on the bare minimum to produce quick results.
In this case we can:
Get All 3D Elements (FEC)
Filter In-Place Elements (Read Properties)
Display Element Id (print)
There's not much room since it's already very simple tool, but still we'll only focus on the bare minimum. Once it works, we can focus on completing all steps and optimizing them.
For now the goal is to verify:
a) Can we do it?
b) Is it even useful?
The rest will follow…
Proof Of Concept Demo
SCRIPT: PROOF OF CONCEPT
CODE
Code Quick-n-Dirty
The Goal is to create a proof of concept. Don't try to make it perfect. Skip steps if necessary. Keep it ugly. Keep it slow. JUST. MAKE. IT. WORK…
Create Proof Of Concept
To create a proof of concept we can simplify steps to focus on the bare minimum to produce quick results.
In this case we can:
Get All 3D Elements (FEC)
Filter In-Place Elements (Read Properties)
Display Element Id (print)
There's not much room since it's already very simple tool, but still we'll only focus on the bare minimum. Once it works, we can focus on completing all steps and optimizing them.
For now the goal is to verify:
a) Can we do it?
b) Is it even useful?
The rest will follow…
Proof Of Concept Demo
SCRIPT: PROOF OF CONCEPT
EDIT
Refactor Everything
Once proof-of-concept works - we can focus on all steps to make everything more structured, optimized and easier to read.
REFACTOR CODE
Let's improve our proof of concept.
To be honest, there's much we need to add here. We're just going to use Linkify to create interactive reports and tidy up our script a little.
So in the end, our script follows:
Get All Elements
Filter In-Place Elements
Create Interactive Report
We'll also put some code into functions to organize it a bit better, but that's optional step.
REFACTORED CODE
STRESS-TEST
Time To Break It!
Don't rush sharing your tools.
Try breaking it before your team does it… You don't want to hear how your tools fails at the cost of your reputation.
Test #1 - Notify Zero In-Place Elements
If there are no In-Place elements, then you'll just print In-Place Elements without any data.
This isn't exactly an error, but it can confuse a lot of users thinking that the tool is not working correctly… And we want to avoid that.
SO let's give a clear message that there are no In-Place elements in the project.
Users might get confused if no In-Place Elements.
SOLUTION #1
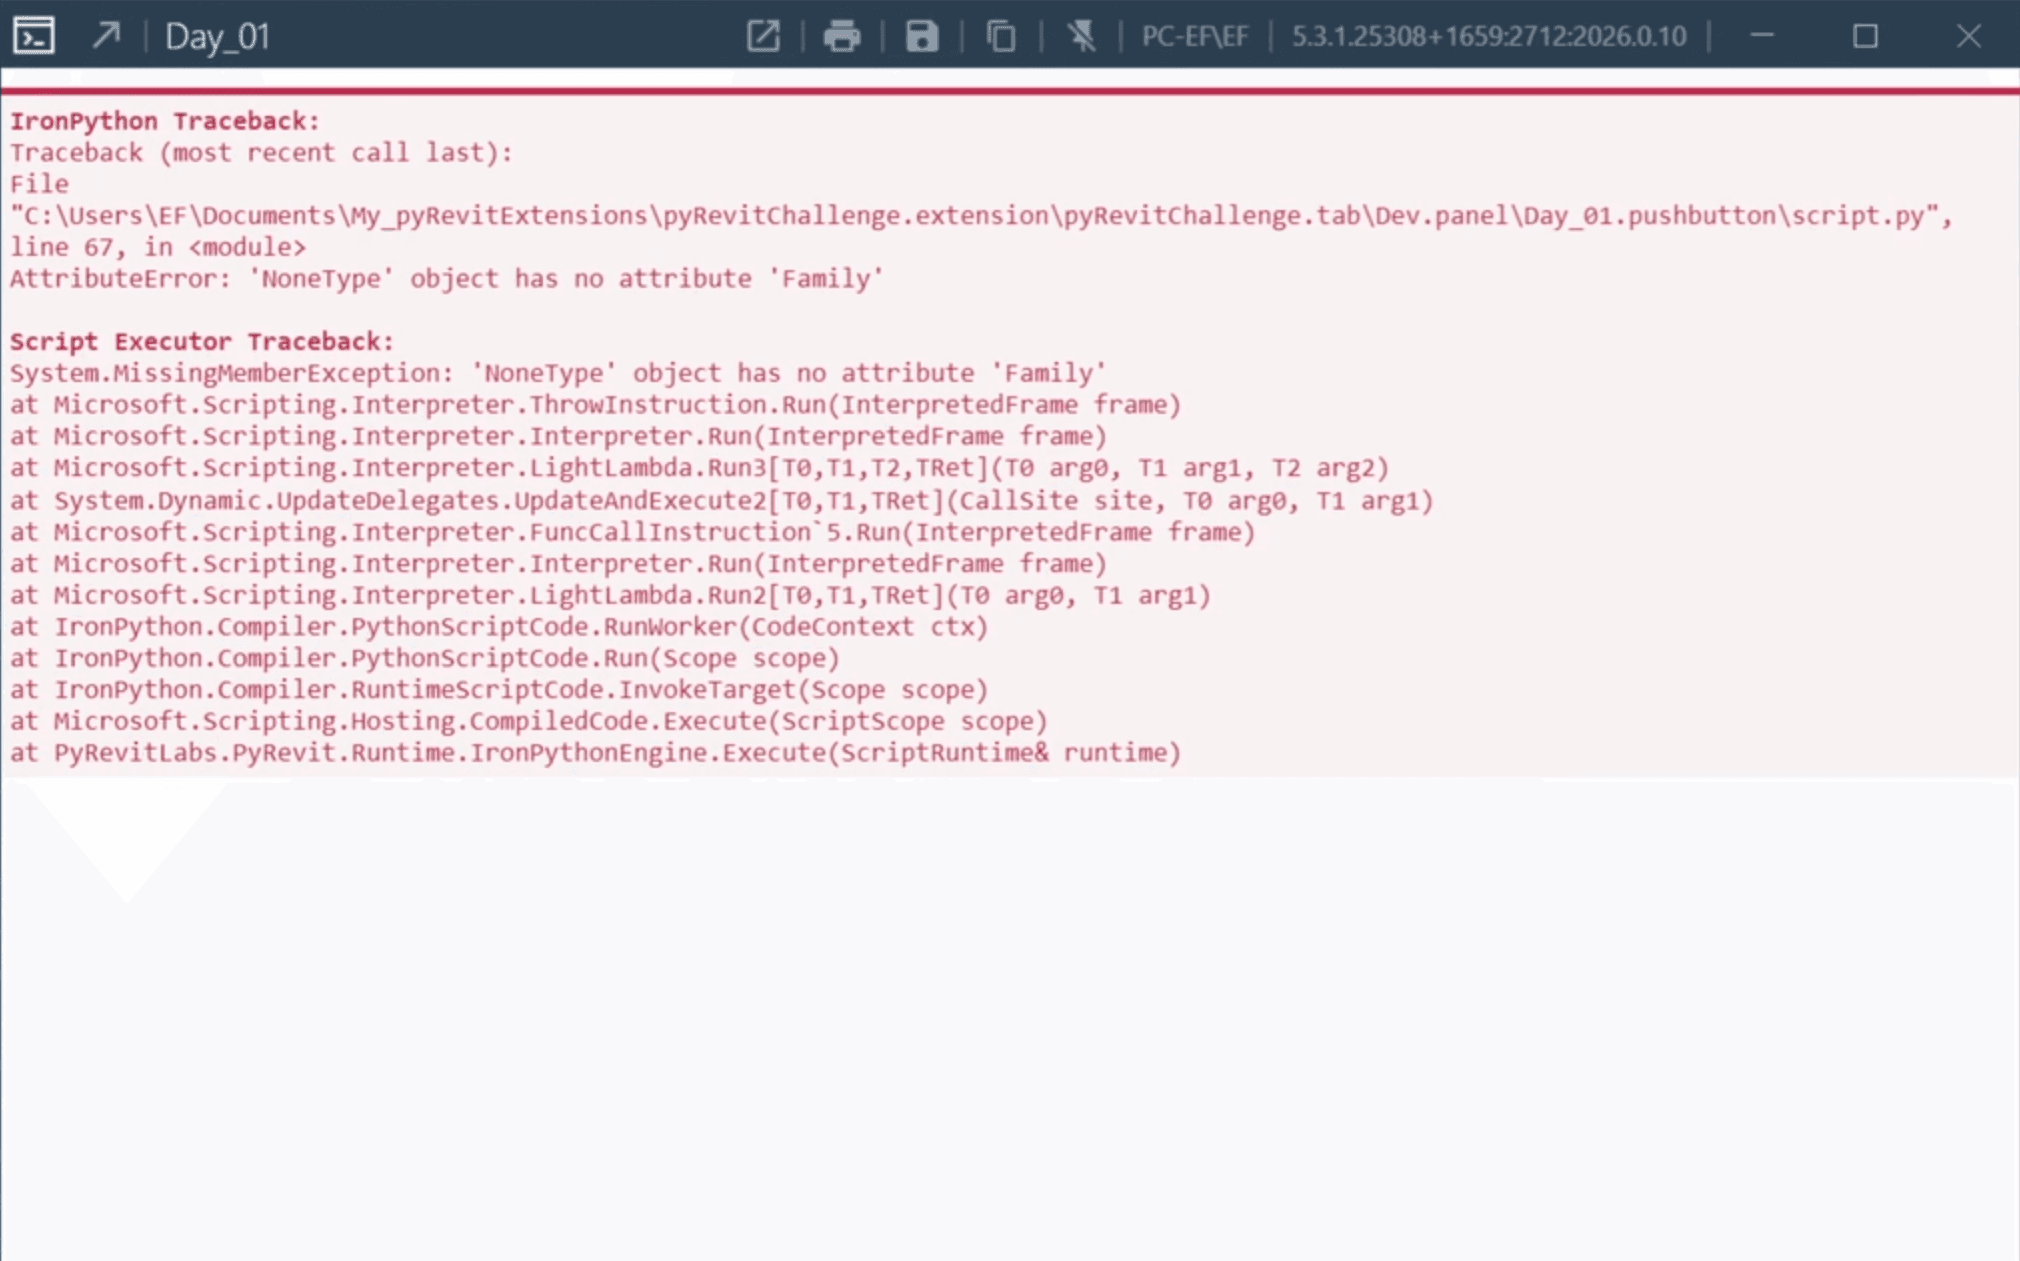
Not all elements share the same properties and methods…
Test #2 - Elements without Type
If you got more elements with a collector you could encounter some issues when you try to read certain properties and methods.
Because not all objects in Revit API have Type and Family. Remember, Revit API includes not only 2D/3D elements. It also includes views, certain properties, and certain invisible objects necessary for the back-end…
Therefore it's good to add try/except blocks and double check that you get certain values…
So add Try/Except Block inside your loop:
SOLUTION #2
Test #3 Check API Changes
Every year we get a new Revit version and it includes new features, updates to existing and sometimes even removal of certain things.
And this also affect API. And sometimes we need to adjust our code for different Revit API versions.
In this case the tool is very simple - so no changes…
But you should always think about it and at least ask ChatGPT if there are any known changes that affect your code.
To check API Changes:
Try your tool in different revit versions (effective but slow)
Manually inspect code (not beginner-friendly)
Ask Chat GPT (10/10 recommended)
ChatGPT can provide really quick overview for API changes!
PROMPT:
STRESS-TEST
Time To Break It!
Don't rush sharing your tools.
Try breaking it before your team does it… You don't want to hear how your tools fails at the cost of your reputation.
Test #1 - Notify Zero In-Place Elements
If there are no In-Place elements, then you'll just print In-Place Elements without any data.
This isn't exactly an error, but it can confuse a lot of users thinking that the tool is not working correctly… And we want to avoid that.
SO let's give a clear message that there are no In-Place elements in the project.
Users might get confused if no In-Place Elements.
SOLUTION #1
Not all elements share the same properties and methods…
Test #2 - Elements without Type
If you got more elements with a collector you could encounter some issues when you try to read certain properties and methods.
Because not all objects in Revit API have Type and Family. Remember, Revit API includes not only 2D/3D elements. It also includes views, certain properties, and certain invisible objects necessary for the back-end…
Therefore it's good to add try/except blocks and double check that you get certain values…
So add Try/Except Block inside your loop:
SOLUTION #2
Test #3 Check API Changes
Every year we get a new Revit version and it includes new features, updates to existing and sometimes even removal of certain things.
And this also affect API. And sometimes we need to adjust our code for different Revit API versions.
In this case the tool is very simple - so no changes…
But you should always think about it and at least ask ChatGPT if there are any known changes that affect your code.
To check API Changes:
Try your tool in different revit versions (effective but slow)
Manually inspect code (not beginner-friendly)
Ask Chat GPT (10/10 recommended)
ChatGPT can provide really quick overview for API changes!
PROMPT:
Time To Celebrate
Share Your Win On LinkedIn
With #pyRevitChallenge
I'll Embed You Here!
© 2023-2026 EF Learn Revit API
© 2023-2026 EF Learn Revit API
© 2023-2026 EF Learn Revit API